
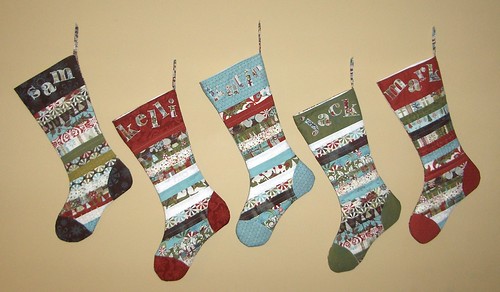
And here is the whole lot of them and as I promised I'll give you the low down on how I made them.
This is not a tutorial, really and I'm assuming you understand basic sewing terms and instructions :)
I started with a HoneyBun of the Figgy Pudding Line by Moda. And 5 quarter yard cuts of tone on tones from that line.
I sewed the HoneyBun strips all together and ended up with a piece of strippy fabric about 41x 45".
I found a stocking shape that I liked (I used one from New Noel) and figured out how big I wanted the contrasting fabric at the top for the "cuff" (It's not a cuff at all) I printed out the family names on my computer and used that to determine the size. Then I cut out the stockings from the stripped fabric, minus the "cuff".
I cut out the "cuffs" from the contrasting fabric, then used fusible web to attach the letters and used a small zigzag in white to stitch them down.
Next, I sewed the appliqued "cuff" to the stocking body. It was at this point that I decided to add the heel and the toe, so I went back to my fusible web and drew those shapes. Then appliqued them on using matching thread, also with a small zigzag.
I then used spray adhesive to attach the stockings to some Warm and Natural. I quilted these with just a straight stitch down each strip. I debated a LONG time about this, but I'm happy with the results. Then I trimmed them.
At this point, I used the stocking to cut out two pieces of lining. (I just used a plain white)
After they were quilted I cut out rectangles of Warm and Natural and backing fabric just slightly larger than the stocking. (This is my new method for sewing layered, shaped things together. A little wasteful, maybe, but I don't have any trouble with my seams catching everything in) Then I layered batting, backing right side up, stocking right side down and pin. I sewed around the stocking, all but the top, trimmed and turned right side out.
Now I sewed the lining pieces together, leaving a 4" opening for turning.
I needed a tab for hanging so I cut 5 pieces about 3" by 8". Folded in half lengthwise, opened up, folded the edges to the middle and ironed, then folded in half again. You know how to do this :) Top-stitched and tacked, using a zigazg stitch, onto the outside of the stocking facing DOWN.
Next, I slipped the stocking inside the lining, right sides together and sewed around the top. Flipped the whole thing out through the opening in the lining. Stitched the opening closed by machine and voila! Done!
I don't know if anyone will be inspired to try this, but if you have any questions, as I'm sure I didn't make this super clear, feel free to ask!
Oh, there was also enough of the stripped fabric left over to make a table runner. It's pieced and ready to be quilted. I think I'll save that for Holiday Show and Tell!


6 comments:
Cute stockings!
Those are very nice
these look beautifu
Very, very cute! I love Figgy Pudding too.
they look great! I'm hoping to make my baby's stocking in the next few days and might put up a simple tutorial, too. :)
I just found your blog and it's darling!!! I love your stockings! Thanks so much for sharing! :)
Post a Comment